If you manage a multi-location or multi-brand business, you know how crucial it is to have all your locations listed on Google. Whether you run a chain of stores, a franchise, or different brands under one umbrella, having each location represented makes a huge difference.
For starters, it boosts the visibility of each location, helps customers find you easily, and enhances your local SEO. So, let me walk you through everything you need to know about adding multiple locations to your Google Business Profile (GBP) to stay on top of your game.
What is a Google business location and a business group?
A Google business location refers to a specific physical address where a business operates. This location is listed on Google Maps and Google Search, helping potential customers find and interact with the specific location of the business in question.
That said, each location can have its own profile, including details like the business name, address, phone number, hours of operation, and customer reviews.
Managing these locations accurately ensures better visibility and trust among local customers, and it allows businesses to engage their customers effectively, particularly when their local listings match the website secured during the domain registration process.
On the other hand, Google Business Groups (a GBP functionality) streamline the management of multiple business locations, which is ideal for enterprises, franchises, and agencies, allowing them to oversee several branches or brands from a single dashboard.
By grouping locations, you can easily apply changes across your profiles, control user permissions, and ensure consistent information and branding since the main benefits include centralized management, access roles, bulk updates, and enhanced security.
Statistics: Businesses with complete and accurate listings are twice as likely to gain the trust of potential customers.
38% more likely to attract in-store visits and almost 30% more likely to see a purchase.
Source
How to manually add multiple business locations to your Google Business Profile?
If you are wondering how to add a location to your Google Business Profile (GBP), note that you can complete this process in a few steps through Google:
- Log into your Google Business Profile
- Create your new location
- Provide your new business location details
- Verify your new business location
- Add relevant details and photos to your location
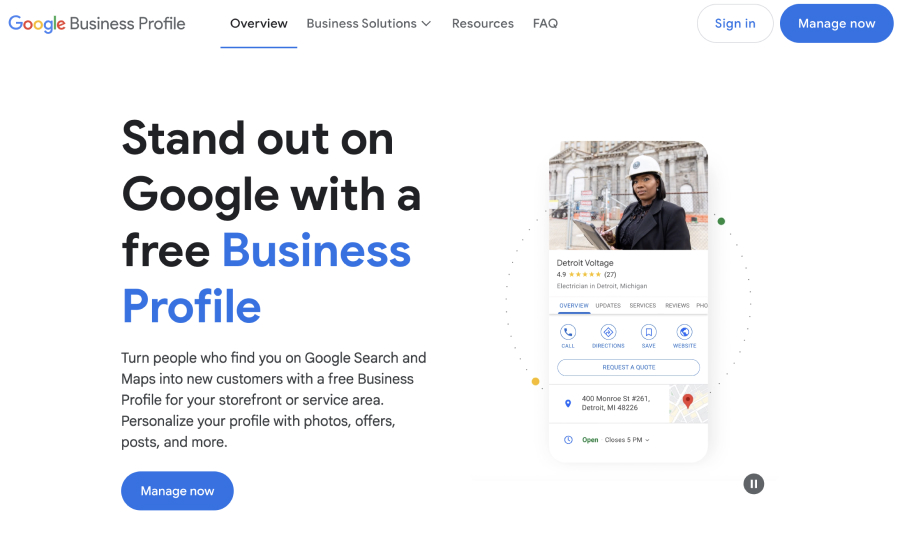
1. Log into your Google Business Profile
First, you must visit Google’s Business page and sign in to your profile:
2. Create your new location
You have two options to access the settings to add a new Google Business Profile:
In Google Search
Once you log in to your Google business profile and click Manage Now, you will get to the Google search section with all the links to manage your profile. Click on the top right 3 dots next to the Profile strength indicator and select Add a new business profile, as shown below:

In Google Business Profile Manager
Go to the Google business locations page in your profile by navigating to the ‘Businesses’ tab inside your GBP manager and click ‘Add business’ → ‘Add single business’ to start creating your new business location:
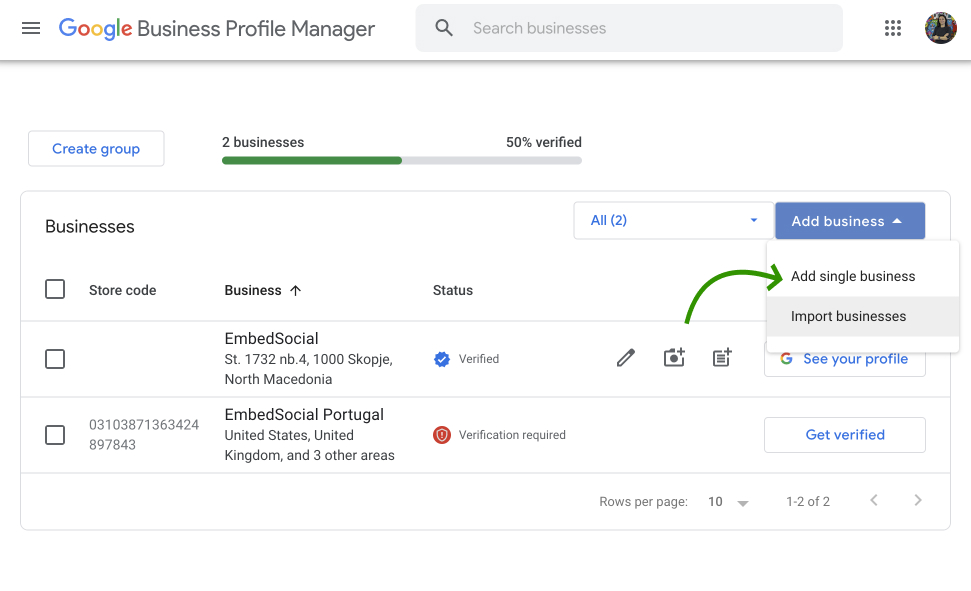
Once you select one of the above options, you will enter the step-by-step guide to fill in all the necessary information to complete your business profile.
3. Provide your new business location details
During the following steps, you will be asked to provide your business details, including the correct business name, category, address, contact info, and more:
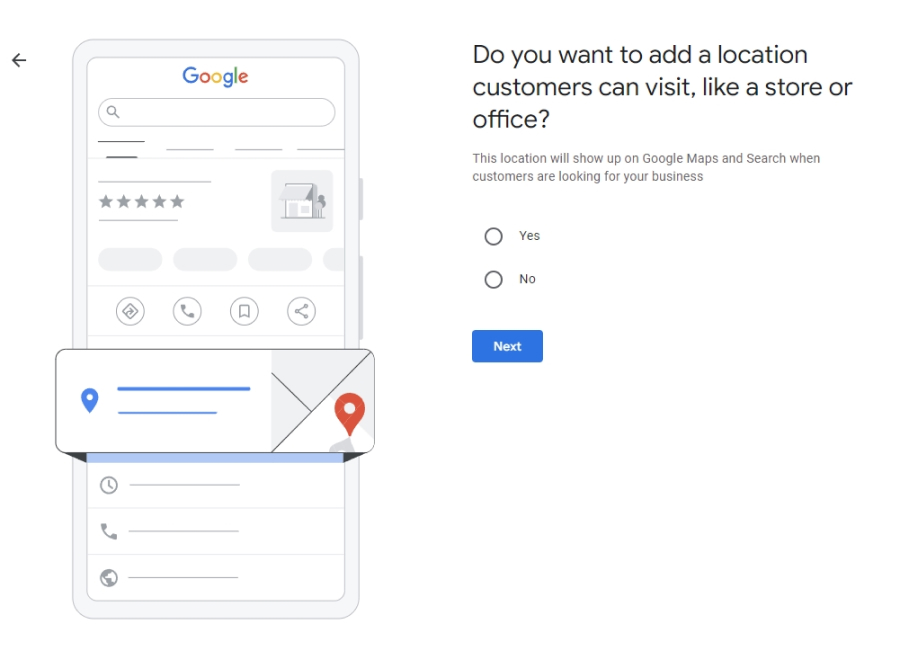
Note: You must be careful to provide accurate and up-to-date information.
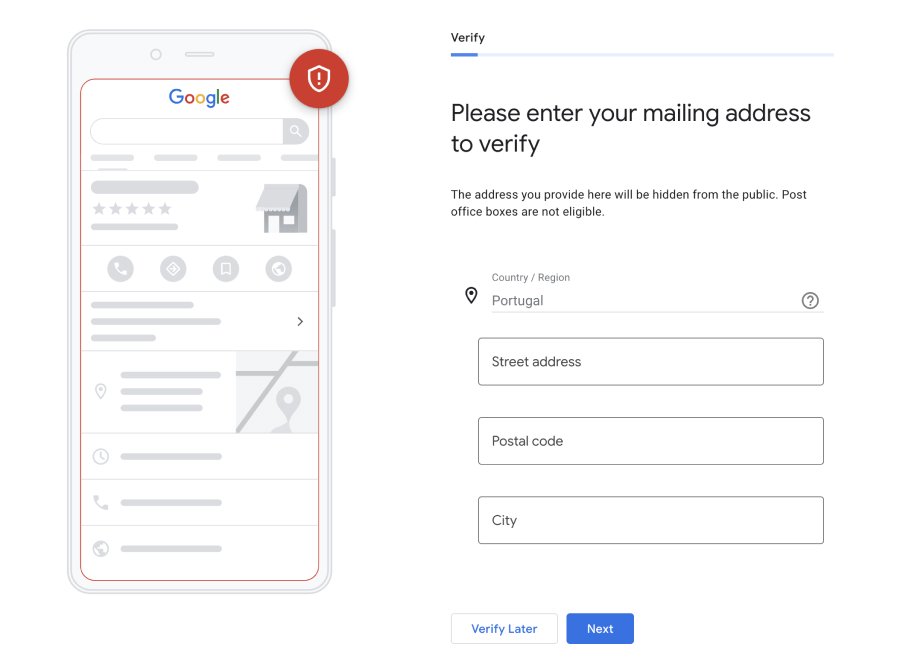
4. Verify your new business location
One of the last and most important steps is to verify your new business location before you can use it. The best method to do that is to request a code by phone, but if you don’t provide the code, you can also verify it with your company address:
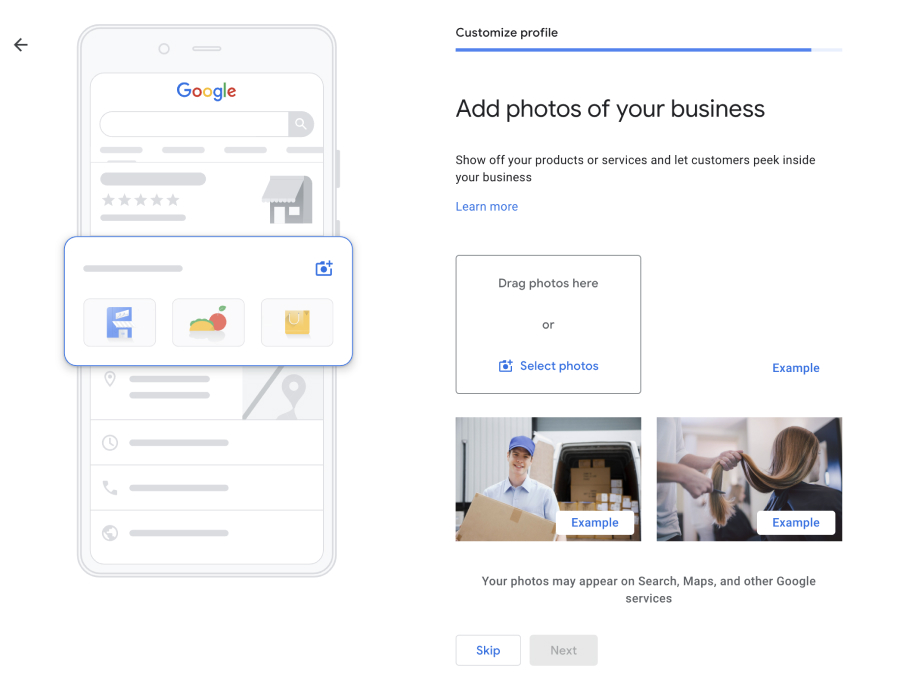
5. Add relevant details and photos to your location
The last steps involve adding your services, business hours, and messaging preferences. Also, you will be asked to describe your business in detail and add relevant photos:
Once you complete the process, you can sign into your Google Business Profile to check on the status of the verification process. If you choose to verify via a code, you must tap the ‘Enter code’ button next to your newly-created process to complete the process.
Note: You can start advertising your new business location using Google Ads and your edits will be visible once you’ve been verified by Google.
How to add Google business profiles in bulk for more than 10 locations
If you are dealing with more than 10 Google business locations, you can streamline the process of adding them one by one via the ‘Import businesses’ feature:
- Access the ‘Import businesses’ feature via your GBP Manager
- Download all spreadsheets for a bulk business upload
- Check out the sample spreadsheets and fill out the template
- Upload the completed template spreadsheet
- Bulk verify all your new business locations
1. Access the ‘Import businesses’ feature via your GBP Manager
Firstly, you have to log into your Google Business Profile, navigate to the ‘Businesses’ tab, and click on ‘Add business’ → ‘Import businesses’.
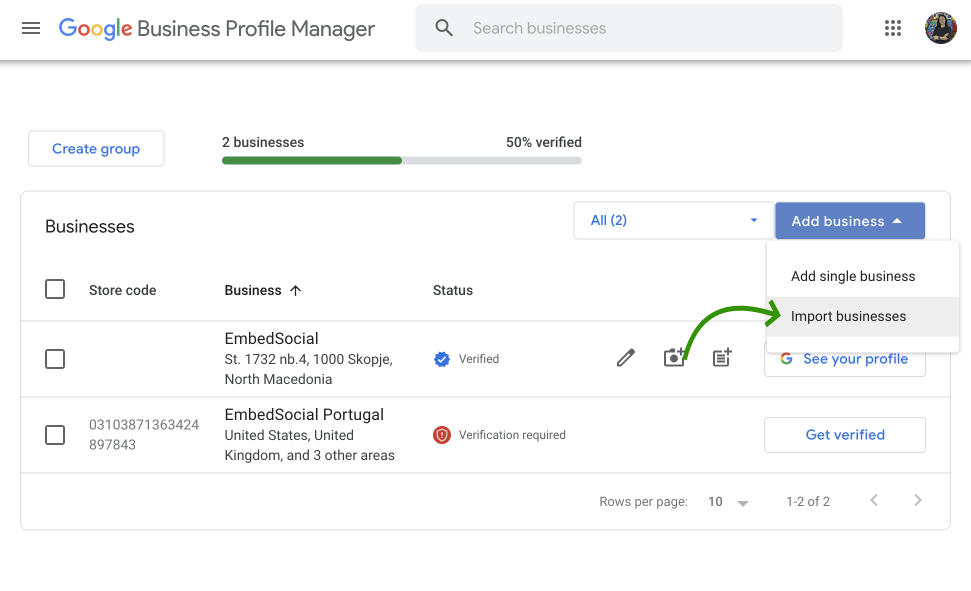
To access all your Google business profiles, go to this link https://business.google.com/locations.
2. Download all spreadsheets for a bulk business upload
Next, you have to download all the spreadsheets you need to create the file that you will use to upload all the locations of your multi-brand or multi-location business:
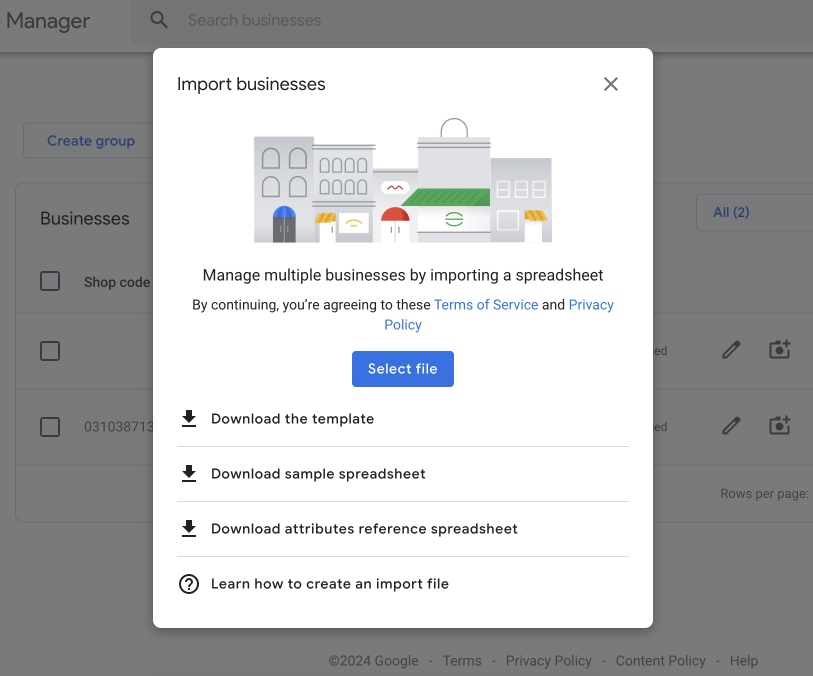
3. Check out the sample spreadsheets and fill out the template
This step is the longest and most important, so you have to pay special attention. First, you should check out the same spreadsheet to get an idea of the information you have to provide for all your locations; then, you have to fill out the empty template:
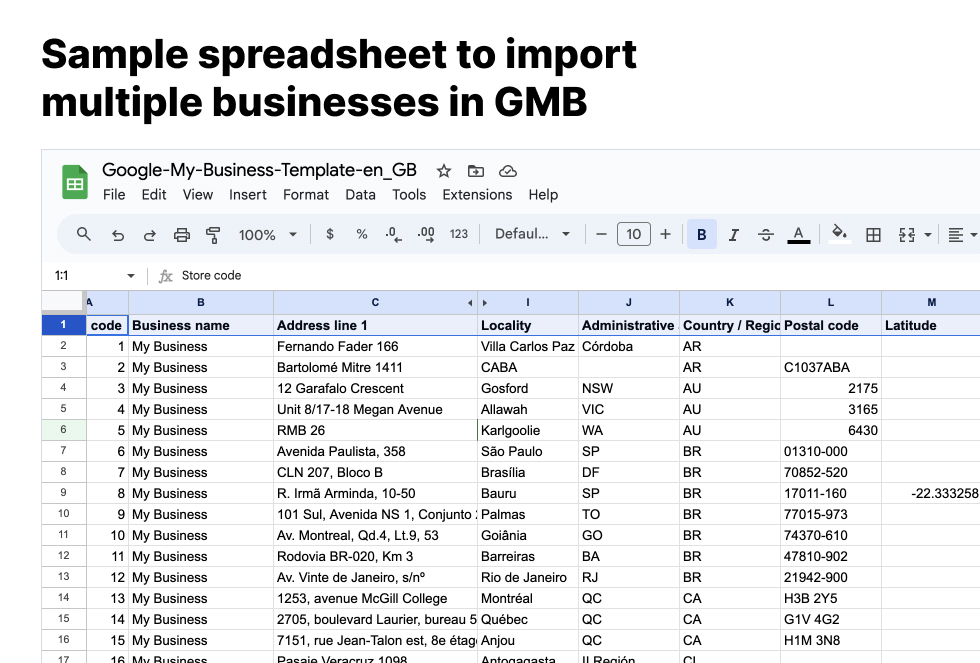
Note: Columns that don’t apply to your business can be left empty.
4. Upload the completed template spreadsheet
Once you meticulously fill out the spreadsheet with the information of all your Google business locations, click on ‘Import businesses’ again and press ‘Select file’. Then, locate the spreadsheet you just created and upload it to your Google Business Profile.
5. Bulk verify all your new business locations
Last but not least, you have to verify all your new locations. To do that, simply tap the ‘Verifications’ tab from the left-hand ribbon menu and select the type of verification you need. You can choose between ‘Chain’ (for enterprises and franchises), ‘Service area’ (if you providing services without a storefront), and ‘Different brands’ (for multi-brand businesses).
You will typically have to provide the addresses and contact info of all locations, and you will typically have to wait up to a week for the process to complete.
How to create a Google business group?
Creating a business group is very straightforward, and you can complete the process in a couple of minutes straight through your Google Business Profile Manager:
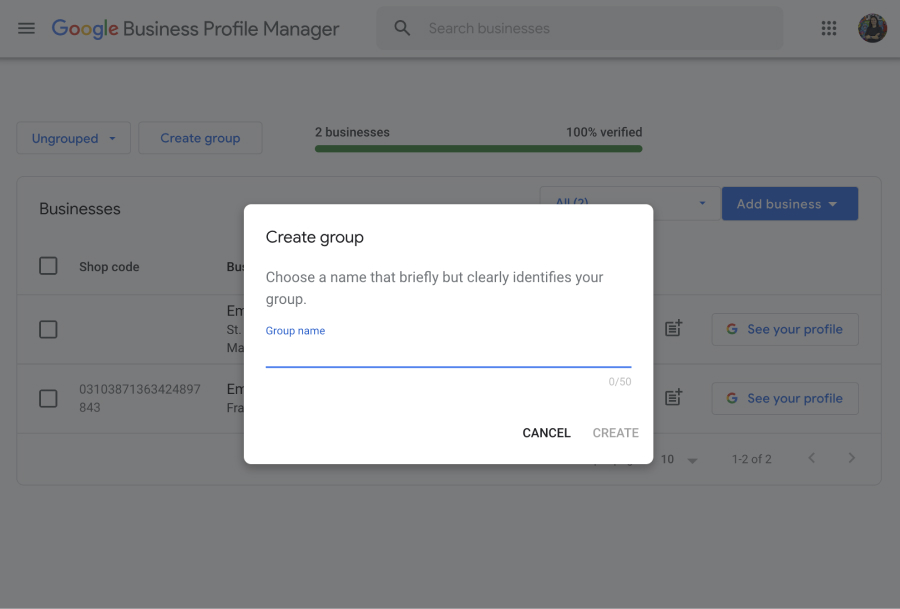
- Sign in to your Google Business Profile and tap ‘Businesses’ in the left ribbon;
- Tap on ‘Create group’ at the top of the page and enter the Group name;
- Tick all the business locations you want to add to your group;
- You need to have admin access to these locations.
- Click on the ‘Actions’ button as soon as it pops up and click ‘Transfer business’;
- Choose the group to which you want to transfer the location(s).
Voilà! Now you have created your first Google business group, which makes it much easier to manage all the locations that are part of that group, such as sharing access to multiple locations at once and applying group-wide changes.
At any time, you can add a new location or an existing one, assign roles and permissions, and utilize bulk management tools for efficient updates. This approach not only saves time but also ensures accuracy and security across all business locations.
What to do after you add multiple locations on Google?
Once you are done adding all your Google locations to your Google Business Profile, there are additional important steps you have to follow:
- Optimize all your Google business locations
- Manage your Google locations via a reputation management platform
- Encourage the collection of Google business reviews
- Maintain ownership of all your Google locations at all times
- Schedule and display your Google business posts
1. Optimize all your Google business locations
Once you’ve added all your business locations to Google, the next step is optimization.
First, you should add the relevant info to your locations, such as accurate business category and name, business address, phone number, hours of operation, and categories.
Then, you have to upload high-resolution photos of your business. For example, if you operate a physical store, add photos of the interior and the products you are selling.
Finally, remember to use consistent branding (logo, colors, etc.) across all locations, incorporate relevant keywords for SEO purposes, and keep your profile updated.
2. Manage your Google locations via a reputation management platform
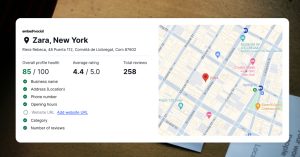
Managing multiple Google business locations can be challenging, but a reputation management platform like EmbedSocial offers features to streamline the process:
- Centralized management—you can quickly connect all your Google locations to your EmbedSocial account and manage the reviews you collect from them;
- Generate online review reports—you can download comprehensive reports of online reviews (custom time range) to gain insights to improve your services;
- Moderation tools—you can automatically and manually filter and address negative and positive reviews to maintain a great online reputation;
- Google review autoresponder—you can save a ton of time by setting up EmbedSocial’s review autoresponder feature to reply to both positive and negative reviews;
- Social proof—the most important feature is the option to display all your reviews across your website and social media channels to build trust with customers.
For displaying all the best reviews you collect, premium review aggregator platforms offer various Google review widgets and allow you to customize them to suit your website. For instance, EmbedSocial comes with over 80 widget templates to suit everyone’s taste:

FYI: You can automatically embed Google reviews widget on your website and show authentic user-generated reviews, increasing trust for more sales. Try it now.
3. Encourage the collection of Google business reviews
Since online reviews are crucial for building trust and boosting sales, you must encourage your customers to provide you with feedback whenever you interact with them.
Some of the most obvious methods to collect more reviews include:
- Ask them directly—train your staff to request reviews from satisfied customers after a purchase or service.
- Send follow-up emails—send automated follow-up emails thanking customers for their business and asking for a review.
- Provide incentives—offer small discounts or freebies as incentives for customers to leave reviews.
- Streamline the process—provide a direct link to your Google review page on receipts, business cards, and your website.
Thankfully, you can also rely on a third-party online reputation platform like EmbedSocial to help you collect more customer reviews.
As an example, you can set up email and SMS review request templates and send them out daily with a few clicks. Also, you can create a ‘Leave a review’ button and embed it on your website to simplify the review submission process for your customers.
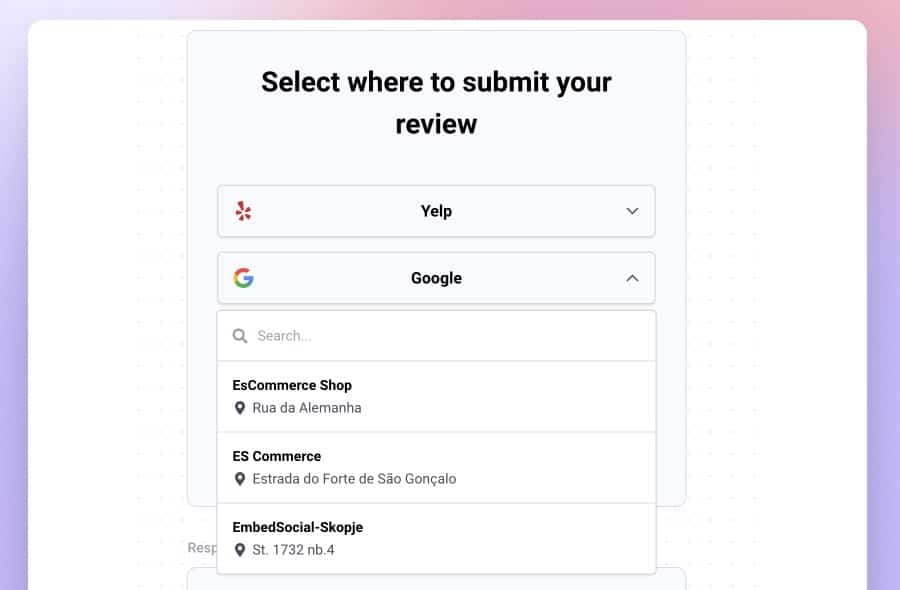
Finally, when sending the link to collect reviews, it is usually problematic to know which location to send it. That is why you can use the reviews form with multiple links to different Google locations and only send the link to this form—where the customer can choose for which location they want to leave the review. Here is an example:
Read more:
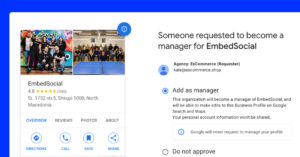
4. Maintain ownership of all your Google locations at all times
When you manage multiple locations on Google, you must also remember to maintain full ownership and control of all of them at all times, which is something business owners forget to do when employees who were managing these locations leave the company.
For that reason, you must regularly review and update access permissions to ensure only current employees can manage your profiles, and when someone leaves, immediately transfer ownership and management rights to avoid unauthorized changes.
Adding, editing, and removing profile managers is very straightforward:
- Search for your business on Google using your GBP account;
- Tap on the three dots → ‘Business Profile settings’;
- Click on ‘People and access’ → ‘Add’;
- Enter the email address of the person you want to add;
- Choose whether you are adding them as an owner or manager.
On the other hand, to remove access, select the user and tap ‘Remove person’.
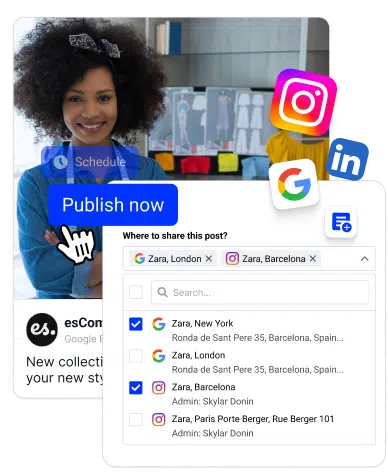
5. Schedule and display your Google business posts
Business owners and managers can also publish posts on their Google Business Profile to enhance the visibility of their brand and interact with their customers.
To make the most impact, you should create compelling posts with clear messaging and engaging visuals regularly, which requires time and effort to do right.
For that reason, you should use a social media scheduling tool, like the one EmbedSocial offers, which simplifies your posting strategy and saves you time for other tasks.
The process to schedule your Google Business Profile posts is simple:
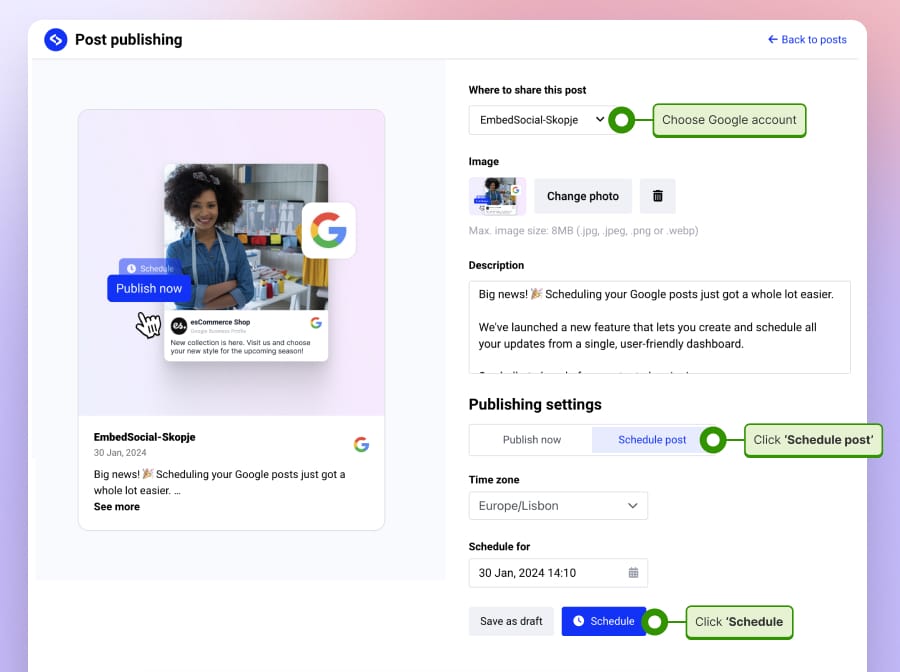
- Sign up for EmbedSocial and access the Feeds dashboard;
- Click on ‘Publishing’ → ‘Create post’;
- Choose the Google profile where you want the post to appear;
- Add your media and write a catchy post caption;
- Tap on ‘Schedule post‘ and enter when you want it to go live.
Good job! Your post will appear on your Google business listing at the time you choose. Here comes the good part: once it goes live, you can pull it via EmbedSocial and display it on your websites and social media accounts as you can with online reviews, as shown above.
Key takeaways
As you can see, adding multiple locations to your Google Business Profile is not that difficult. Plus, you can streamline the process if you are adding more than 10 locations.
If you are managing a multi-location or multi-brand business, add all your business locations as soon as possible to boost visibility and improve local SEO for all of them.
However, once you set up all your locations, you have to start managing the Google reviews for your multi-location business via a platform like EmbedSocial.
By following these steps, you ensure your business maintains a strong online presence, helping customers find and trust your various locations easily.
FAQs about adding multiple GBP locations
Can a Google business have two locations?
Yes, your Google business can be listed multiple times to help customers find the different branches easily. Adding a separate location helps provide the right information to local customers. Also, it increases the visibility of the business on Google Maps and search results.
How do I add a second location to my Google business profile
To add a second location to your Google Business Profile, sign in to your Google Business account and click “Add location” from the dashboard. Follow the prompts to enter the new location’s details, verify the location, and manage it alongside your existing profiles.
Can Google My Business have multiple locations for the same review?
No, Google Business Profile does not support multiple locations for the same review. Each review is tied to a specific location to ensure authenticity and accuracy. To provide genuine feedback for a specific branch, customers need to leave a review at that specific online location.
How to optimize Google Business Profile for multiple locations?
To optimize your Google Business Profiles for multiple locations, ensure each profile has accurate and complete information, including hours, contact details, and lots of photos of your products and services. Also, regularly update with posts, engage with reviews, and use consistent branding and keywords across all your profiles to improve search visibility.